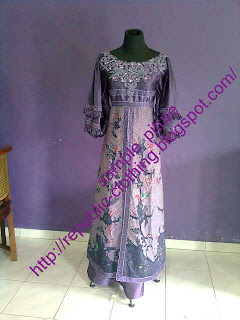
model kebaya modern wedding


model kebaya modern wedding easy collaboration with purple petunia that was wrapped with so many knick-knacks that this spectacular can you have with therelatively cheap prices may be around 800,000 rupiah only because of the kebayacloth used contains a very elastic fabric original silk Indonesia

 one of the many models provided kebaya but putihlah color that is often used whentraditional wedding because there INDONESIA provide confidence that marriage is a sacred thing and is often likened to a white warnah so that Indonesia's wedding whileoften wearing a white kebaya of the bride or the bridegroom.
 This is a pair of dress kebaya is the above, 
the materials used are relatively inexpensive
 so that the kebaya is probably worth
 about 200,000 to 400,000 thousand Rupiah only.
 This is a pair of dress kebaya is the above, 
the materials used are relatively inexpensive
 so that the kebaya is probably worth
 about 200,000 to 400,000 thousand Rupiah only.


 if you choose the color motif is a modern kebaya
kebaya variations also allow you to a wedding oryou wear when going shopping

Basic Pattern Arm


Size Required

1). Concave arm circumference = 40cm (measured from the pattern of body)
2). Peak height = 12 cm arm
3). Sleeve length = 24 cm
  
Description sleeve pattern

Drawing arm pattern begins dai point A which is the top arm.

A - B = length of arm.
A - C = size of the peak height arms, make the line up to point D and E, when measured from point A ½ concave arm circumference size met with lines of tititk C.

Create a dashed line (help lines) from A to D and from A to E.
Help lines from A to D and A to E divided by three. 1 / 3 from A to D
given point A1 and from A to E is called the point A2.

A1 - A4 = A2 - A3 = 1.5 cm.
Point D1 = 1 / 3 D - A
D to D1 D2 divided by two named points.
D2 - D3 = 0.5 cm.

Connect A with A4 to D1, D3 and D like images (concave arm circumference of the face).
Connect A with A3 and E like the picture (arm circumference concave rear).

G - G1 = E1 - E2 = 1.5 cm.

Connect E with E2 (side arm rear), and D with G as the picture (side arm of the face)

Basic Pattern Making Skirt


Description pattern front skirt
Drawing skirt pattern starting from point A.
A - B = length skirt. A - C = high hip. A - A1 = ¼ waist circumference plus 4 cm (3 cm to large pleated coup, 1 cm to distinguish pattern size pattern degan rear face).
A1 - A2 = 1.5 cm.
Connect A with A1 as the picture (the waistline).
A - D = 1 / 10 waist. D - D1 = 3 cm.
At the center line between D and D1 made a straight line until the boundary line C with C1 (the pelvis).
D - D1 = 12 cm. C - C1 = ¼ hip circumference plus 1 cm. B - B1 = C - C1. B1 - B2 = 3 cm. B2 - B3 = 1.5 cm.
Connect A1 to C1 form the hip line and from C1 to B3. Connect B to B3 as the picture (bottom line skirt.)
Description of the rear skirt pattern
Drawing rear skirt pattern similar to the way meggambar front skirt pattern. The difference lies only in waist circumference and hip circumference. Measuring waist circumference and hip circumference size larger pattern of the face 2 cm from the pattern of the back.
But the shape of the side line, waist line and bottom-line skirt with front skirt pattern. For those reasons, the pattern of the rear skirt is made from the front skirt pattern. To distinguish it enough to move the center line of the face amount of 2 cm by measuring from A to E the same as from B to F is 2 cm, connecting point E to F with the straight line (line center back).
If you want to have the pattern front and rear patterns on different paper, preferably one of the skirt pattern moved. Should the transferred pattern is the pattern of the back, thus on the front skirt pattern also found the back of the pattern. In moving the pattern to note the midline behind the pattern should be in a straight position, the waistline and side-line skirt shape must be equal to the original.

about kebaya indonesia

kebaya is clothing that is used in a particular event such as weddings, graduation events, etc., here will I demonstrated some nice kebaya if used in a special event
This white kebaya has several features one of which is more closed and these clothes have a very delicate fabrics as silk and more special where it again kebaya this one gives the impression of a very beautiful because of knick knacks that are given and shown more modest but charming
kebaya this one gives the impression of more modest but if you know what is in each bandage this kebaya is was he had a finer fabric above from the kebaya and chest he exceeds the knick knacks that more and more beautiful.
purple kebaya girl who has a nicer cloth bandage adari in kebaya those presented above because of the color and knick knacks from the kebaya has the impression of more luxurious and more beautiful than kebaya above was therefore no surprise that most women INDONESIA generally choose this color as his favorite color
 photos from the close of this kebaya we can see how polite this kebaya because from top to bottom of pakian is closed and wrapped with a beautiful knick knacks
 kebaya is wrapped with gold color has the impression that sangt luxurious and usually of very stout woman who practically rich INDONESIA prefer this color kebaya besides he has a very beautiful color too many knick knacks she is more stunning than the above was kebaya
kebaya pictures closer than you can see how many knick knacks that are used in this kebaya

 see what a luxury this kebaya.


here are a few of the many kebaya kebaya worn and used in a special event in Indonesia in general, may be useful for those interested in copying of content is expected write in to blogs address and did not change the bit parts that have been mentioned.

Click Here For Download

Equipment and Materials for Design

To produce a good design to be supported with the procurement of equipment and materials that support. Equipment drawings are an important part that should be provided for the smooth working. Equipment of good quality will also improve the quality of the resulting design, as it will facilitate the work so as to achieve maximum results.
Knowledge and skill of drawing tools are very pemting. Sometimes not all artists / designers fit and able to use a particular tool or similar tool in realizing the design such as using watercolor / aquarel, color pencil, oil paint, ink, markers and more. Basically every type of equipment will have the goodness and badness, and each of these tools also have different effects on the design.
Especially for fashion designers are encouraged to practice how to use all the drawing tools, including special computer design if necessary because each tool is essential and requires certain skills.
The tools and materials used to design, namely:

1. Pencil
Pencil used are lead pencils made of graphite. Pencil is excellent for use and available in several different sizes. To scratch a little harder with the code H / HB, to draw sketches of clothes should use a pencil B. Pencil B has a size of 1 to 8 B. B The higher the number the more soft pencil. Soft pencil handy for shading or provide shade on the design.

2. Colored pencils (colored pencil)
Color pencils used to refine the design to make it look more attractive. Pencil can also be sharpened so that it can refine complex parts such as bags and small, collar motif textiles and others.

3. Eraser (eraser)
Removal should be provided when designing since the early scratch is not necessarily a good direct and satisfying, especially for beginners.

4. Rol / ruler
Rol useful to give a frame of drawing paper or make the straight striped areas.

5. Brush (Brushes)
Brush-shaped hairs are made of synthetic material. Brush has a variety of shapes and sizes of lots. Choose a good quality brush and a suitable size for the design. If the brush is over used to be kept in clean condition and fur faced upwards so that the feathers are not easily separated or broken

6. Watercolors (water color)
Watercolors are available in the form of cake and tube. Choose a good paint and good quality. When choosing the form of tubes of varying colors available, if you choose the form of cake / bottle it is usually our own mix as expected.

7. Paper
Paper is available in a variety of shapes and sizes. Use paper as needed. The types of paper, among others, photocopy paper, transparent paper, and paper drawing / sketch pad.

8. File / envelope
File or envelope handy for storing clippings fashion, the pieces of textile materials and for storage of the finished design. Clipping is useful to increase the inspiration of the designer in developing his idea.

Drawing patterns of adult women's clothing basic dress making system


Size required for the system pattern Dressmaking


a) Neck Circumference: 38 cm
b) face width: 33 cm
c) Ring body: 88 cm
d) chest Height: 15 cm
e) Waist: 66 cm
f) hip circumference: 96 cm
g) High hip: 16 cm
h) back Width: 34 cm
i) Length of back: 37 cm
j) The length of skirt: 50 cm
k) shoulder length: 12 cm
l) Length of arm: 24 cm
m) High peak arm: 12 cm


Notebook: The above measure is a measure to learn to draw basic patterns of adult women's clothing. So to make your own clothing patterns only replace the numbers according to your size


Description of Pattern

Drawing patterns Dressmaking system starts from the back pattern, but previously determined general guidelines are ½ size circumference body that starts with a dot.

A - B = ½ the size of the circumference of the body.
A - C = ¼ body circumference plus 1 cm.
B - B1 = 1.5 cm.
B1 - D = length of the back, make a horizontal line ketitik E.
B - B2 = 1 / 6 the circumference of the neck plus 1 cm.

Connect the dots B1 to B2 as the picture (behind neck).

C - C1 = 5cm, connect it to the point of B2 with a dotted line (help lines).

B2 moved the length of the shoulder through help lines are named point B3

B3 - B4 = 1 cm, equate the size of the B2 to B4, and connected with a fine line.
B1 - G = back plus 1 ½ cm long, make a left horizontal line and name the point H.
B1 - G1 = 9 cm.
G1 - F1 = ½ width of the back (for the line width of the back).

Perimeter shape concave rear arm from the point B4 to F1 continue to F as shown.

D - D1 = ¼ waist size plus 3 cm (large pleated coup) minus 1 cm.
D - D2 = 1 / 10 waist.
D2 - D3 = 3 cm (large pleated coup).

Of D2 and D3 divided by 2, made the dashed line to the body line (G and H) were measured 3 cm down, connected with dots D2 and D3 to pleated coup.

D - D1 = waist size plus ¼ 3 cm.

D1 associated with F, a line the back side of the body.


Description of the face pattern

A - A1 = 1 / 6 the circumference of the neck plus 1 cm.
A - A2 = 1 / 6 the circumference of the neck plus 1.5 cm.

Connect the dots A1 to A2 as a picture (face pattern neckline).

A1 - C2 = length shoulder.
A2 - A3 = 5 cm.
A3 - F2 = ½ width of the face.

Connect the dots C2 to continue F2 to F as the picture (concave arm circumference of the face).

E - E1 = 2 cm (as big as the size of the coup side).
E1 - E4 = ¼ waist circumference plus 4 cm (3 cm large pleated coup and 1 cm to distinguish patterns of face-to-back).

E1 - E2 = 1 / 10 waist.
E2 - E3 = 3 cm (large pleated coup).

E2 and E3 be divided by two dotted lines to the center line of the shoulders.

A2 - J = chest height.

From A line made up to J1.

J1 - J2 = 2 cm, then connected with the points E2 and E3 form a pleated coup.

F - I = 9 cm, then connected with a dotted line to the point J1.

J1 - K = 2 cm.

From I to I1 and I2 measured each 1 cm, then connect with the point K.

I1 - K = I2 - K, which was long used as a benchmark to measure I1 K.

E4 is connected to the I2 and I1 with the F point, a line side of the face.

How to Take Women's Clothing Pattern Adult Size


Caption:
1) Neck Circumference: measured around the neck is not too tight, not too loose


2) The width of the face: measured 6 or 7 cm from the curve of the neck down, and then measured the circumference of concave boundary flat of your left arm up to the limit right arm circumference concave


3) Circle entity: measured around the largest body cm position is not too tight and plus 4 cm.


4) High Chest: measured from the middle curve of the neck face up to the limit between the two points left and right breast.


5) Waist: measure around the waist fit


6) hip circumference, measured at the hip circle the thickest horizontally with not too tight


7) High pelvis: measured from the waist up to the biggest hip on the back


8) back Width: 9 cm measured downward from the back of the neck bone is then measured horizontally from the boundary circle to the circumference concave concave left arm right arm


9) Length of back: measure from the spine straight until boundary waist


10) skirt length: measured from waist to desired length skirts


11) shoulder length: measured from the boundary to limit shoulder neckline lowest


12) Length of arm: the shoulders are measured from the lowest to the desired length


13) High peak arm: the shoulders are measured from the lowest up to the biggest arm / arm muscles or equal to the length of shoulder

kebaya design of choice

kebaya covered with knick knacks, combined with the stunning colors of red cloth now you can have with affordable prices ranging from 30 dollars to 500 dollars depending on fabrics and knick knacks that are used
 
kebaya that this may be very luxurious and very classy, although simple but if you know the price of kebaya that this very expensive because the fabric is made from pure silk and with a dazzling wrapping knickknacks and the like kebaya prices range from 3000.000 to 5000.000 rupiah rupiah and perhaps also more than the price I expected at this time


Tailoring wide-necked short kebaya

 How to make a pattern   

• Make basic pattern front and back until your hips • Draw a neck in front and rear pattern • Extend into kupnat front neckline, down to the bottom, quotes and separate the front right and left 


• Make pattern fit the user's arm, but the length plus 2 cm • Design front pattern that has been separated above the fabric, also behind the pattern and the pattern of arm    

X-X fabric width 55 cm x 2 = 110 X-Z Fabrics 135 cm long LD Layer chest Rear layer LB 
• The pattern of the left front (which will become the center front) is designed in a different fabric


How to sew:
1. Obras all lint pieces of fabric that will be sewn
2. Attach fabric lining the chest, turn and grinds 1mm from the edge of the seam, fold the edge / lint layer inward, then the machine grinds with tailoring with stab som.
3. Sewing is back kupnat
4. Front shoulder seam, with shoulders back, neck and attach the fabric layer, the layer with the machine grinds, 1 cm from the seam, baste and sew with a stab som
5. Put a zipper on the back center seam
6. Hem stitching right and left side of the body then jahitlah bottom hem with stab som
7. Hem stitching right arm and left later with a stab som hem jahitlah
8. Put your right arm and left arm in arm hollow body